Fix damaged walls with these DIY repairs you can do. Don’t melt down if a doorknob, misguided chair or an impromptu hockey game knocks a big hole in your drywall. With a little patience, a little joint compound and a few dabs of paint even a novice can complete a near invisible wall repair.
TIME One day
COMPLEXITY Simple
COSTUnder $20
Large holes
Step 1: Check for wires
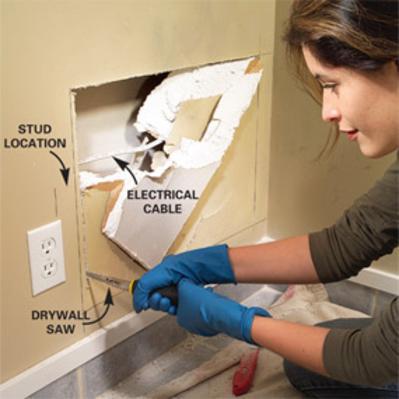
Photo 1: Draw a rectangle around the break with a straightedge or square. Look or put your hand through the break to feel for wires or other obstructions. Then cut out the section with a drywall saw or utility knife.
Step 2: Insert backer boards
Step 3: Tape the joints
Step 4: Apply a second and third coat
Step 5: Sand the dry compound

Before cutting out the damaged area, check the wall for obstructions. Often you’ll find a wire, pipe or duct (Photo 1). If so, work carefully around them with a drywall or keyhole saw. Or make a shallow cut by repeatedly scoring the line with a sharp utility knife. It’s easier to add backer board than to try to cut the drywall over studs (Photo 2). Cut the backer boards about 4 in. longer than the height of the hole. Pine or other soft wood works well. Hold them tight to the backside of the drywall when fastening them. Hold the boards carefully so the screw points won’t prick your fingers if they pop out the backside. The drywall screws will draw the boards in tight. Sink the screwheads slightly below the drywall surface.
Measure the thickness of the drywall (most likely 1/2 in.), and look for a large enough scrap from a damaged piece at a home center, rather than buy a full 4 x 8-ft. sheet. Cut it to size and screw it into place, spacing the screws every 6 in. Taping the edges of the patch to make it invisible is the trickiest part of the job (Photos 3 and 4). Buy a gallon tub of drywall compound and a roll of paper tape. You can use mesh tape, but it isn’t as strong. If you have a lot of repairs, also buy a sack of 20-minute setting compound. It hardens quickly and doesn’t shrink, so it’s ideal for filling cracks and gaps before applying the joint tape. For smoothest results, also pick up flexible 6- and 10-in. taping knives.
Apply a coat of compound and tape to each joint (Photo 3). Thin the compound a bit with water to help embed the tape. Smooth the tape with the 6-in. knife, pulling out from the center toward each end. Squeeze some, but not all, of the compound out from under the tape so you don’t create a big hump on the wall. Immediately apply a light coating to the topside of the tape, tapering it out onto the wall.
The second and third coats are to blend and smooth the taped joints so they’ll be invisible when painted. After each coat is dry, set a straightedge against the wall to check for obvious dips and bumps. Knock off bumps and ridges with your taping knife. Add more coats as needed. Then sand, prime and paint.
Tip:
When possible, leave a few inches of drywall at corners so you won’t have to spread taping compound onto adjacent walls or ceilings and repaint them as well!

Small Holes
Step 1: Drive a popped nail below the surface
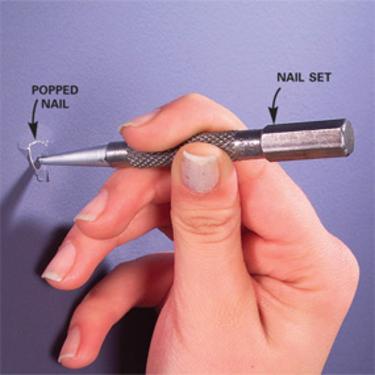
Photo 1: Drive a popped nail below the surface of the drywall with a hammer and a nail set. Cut away loose joint compound and paper shreds.
Step 2: Drive in drywall screws
Step 3: Fill the holes
Small holes caused by screws or hooks, wall fasteners or drywall fasteners that pop up are simple to repair, but again time consuming because you almost always have to repaint the walls. Nail pops are common and particularly irritating, because you’re likely to have more than one. But drywall screws sometimes pop up too, as a result of damp framing that dries out and shrinks during the first year or two in new construction.
The first step of the fix is to drive nails back down using a nail set (Photo 1). If you have screws, dig the drywall compound from their heads with a utility knife and turn them in tight with a screwdriver.
Then dimple the hole slightly concave with a hammer to indent any raised edges. But take care not to crush the drywall core. In addition, cut away any paper tears with a sharp utility knife. This is a good technique to use with old wall fasteners as well. It’s usually easier to tap them into the wall slightly rather than pull them out.
Two coats of drywall compound, applied with two swipes of the knife in a “+” pattern, should fill the holes (Photo 3). The first coat will shrink a bit, leaving a slightly smaller dent to be filled by the second coat. Scrape the excess off the surrounding wall so you don’t build up a hump. Sand lightly to blend with the surrounding wall. Be sure to prime the spot. Otherwise the topcoat will absorb into the patch and make the area look different from the surrounding paint. And use a roller when priming to help raise the surface texture to match the surrounding wall.
20-Minute Setting Compound
Twenty-minute setting compound is a great product for filling deep holes and gaps and for your first taping coat because, unlike regular joint compound, it hardens quickly without shrinking. That means less time spent filling. And you can apply a second coat of compound as soon as the first hardens. You don’t have to wait for it to dry completely.
For most uses, buy the lightweight type. It comes as a powder in sacks. Mix only what you can use in about 10 minutes. It hardens quickly, often in your pan if you’re too slow! Completely clean your pan and knife before mixing a new batch. Otherwise it’ll harden even faster! To avoid clogging the sink drain, throw leftover compound into the trash.

Cracked corners
Step 1: Cut through the tape
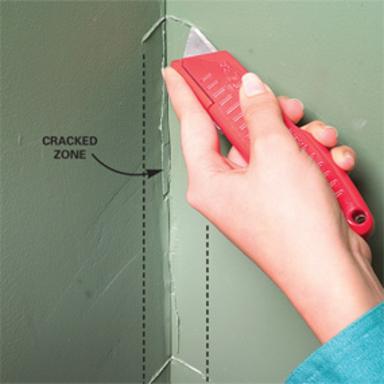
Photo 1: Cut through the tape at the ends of the cracked area and slice, scrape and tear away all loose tape and compound.
