
Do you want to remove or patch a popcorn ceiling? First, remember that removing a popcorn ceiling is a really dirty job. Second, patching a hole is just, well, patching a hole. You should consider simply covering the whole ugly mess with a new layer of drywall instead. It’s probably the easiest way to get the best results.
Step-by-Step Overview
Covering an old ceiling with new drywall is a big job—heavy lifting, a serious time commitment and a major mess. But in some cases, it’s the smartest way to go. We talked to a dozen remodelers, and every one of them made the same point: Sometimes, covering up an old ceiling saves time, money and headaches in the long run.
One of the best things about a ceiling cover-up job is that you can cut holes in the ceiling without fussy repairs later. So it’s the perfect time to add or move light fixtures, install a ceiling fan or run networking cables. If there’s living space above the ceiling, you can even fix floor squeaks or run new plumbing for a future bathroom remodel.
We’ll focus on the details that make this job different from other drywall projects. Go to the drywall section for everything else you need to know about hanging and finishing drywall.
Is this the solution for your problem?
Damaged drywall
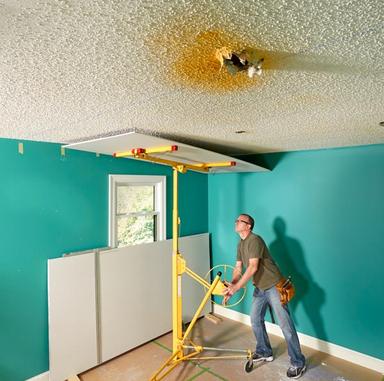
The ceiling shown in this article had flaking texture, plus stains and holes, so covering it all with a new layer of drywall was actually faster and easier than repairing it. If you have only a few holes or stains, repairing them probably makes more sense. For more information, see Textured Ceiling Repair Tips.
Popcorn ceiling
If you have a heavily textured ceiling and just don’t like the look, you have a few options. With unpainted texture, the most common approach is to mist it with a spray bottle and scrape off the softened texture. That makes a big, sloppy mess and almost always leaves you with repairs to do afterward.
With painted texture, some pros scrape as best they can and then “skim coat” the entire ceiling with a thin layer of joint compound. Scraping dry texture is a dusty mess, and skim coating requires some practice. And if your home was built before 1979, the texture might contain asbestos, which can do serious damage to your lungs. So before removing texture, it must be tested (you’ll find lots of labs and instructions online). You can remove texture that contains asbestos yourself as long as you carefully follow safe procedures. For all of these reasons—mess, time, skill level, asbestos—covering a ceiling is often easier than removing texture.
Cracked plaster
If you have a plaster and lath ceiling with a few short, tight cracks, repairing them is probably smarter than covering the ceiling. But if cracks span the entire ceiling or the plaster alongside the cracks feels loose when you press on it, making lasting repairs is tough. Plaster cracks often come back, even after careful repairs. That’s why several pros told us they routinely cover plaster ceilings: it’s the best way to be sure that they won’t have to come back and repair the ceiling again in a year or two. Remove any loose or sagging plaster before covering the ceiling.
Money, time and materials
For a 12 x 12-ft. room, the total materials bill will fall in the neighborhood of $160, including drywall, joint compound, paint and drywall lift rental. With a helper or two, you can cover an average-size ceiling in one day. Finishing, or “taping,” all the joints is much more time-consuming and requires drying time between coats. Then comes sanding and painting. Even if you can devote a few hours every evening to this project, expect it to span at least a week.
We recommend 1/2-in.-thick “light-weight” drywall for this project. It’s not only lighter than standard drywall but also stronger, so you can hang it from joists centered 24 in. apart. UltraLight, High Strength Lite and ToughRock are some brand names you’ll find at home centers. If possible, get sheets that are long enough to span the room. Shorter sheets are easier to handle, of course, but you’ll pay dearly for that convenience when it’s time to finish the “butt joints” where ends of sheets meet. Unlike the tapered joints along the long edges of drywall, butt joints are tough to finish. Avoid them if you can.
Most home centers carry 8- and 12-ft. sheets. Specialty drywall suppliers usually carry those lengths, plus 10-, 14- or even 16-ft. sheets. Just be sure you can get long sheets into the room before you buy; sometimes 8-ft. sheets are the only option. Everything else you’ll need is available at home centers: 2-in. screws, 10-ft. lengths of 1/2-in. tear-away bead, mud rings for junction boxes, joint tape and compound, primer and paint.
Expert advice from veteran drywall contractor Mike Ferguson
A drywall lift doesn’t just make the job easier; it helps you do the job better. When you’re raising sheets by hand, you’re just dying to drive a few screws so you can put your arms down. With a lift, you can take your time, trim the sheet if necessary and get everything just right.
Expert advice from Senior Editor Travis Larson
I love self-feed screw guns because they’re fast: You just pull the trigger and push to automatically load and drive screws. Plus, the gun itself is long, so you can reach an 8-ft. ceiling without a ladder. Aside from drywall, I’ve used my gun for screwing down subfloors and decking too. The only thing I don’t like about it is that it’s usually missing from my toolbox, on loan to friends. You can get a corded version at any home center for about $100. A cordless one costs about $150.